All Categories
Featured
Table of Contents
- – Rv Sofa Beds La Habra, CA
- – OCRV Center
- – Awning Installation La Habra, CA
- – Rv Sofas La Habra, CA
- – Replacement Windows For Rv La Habra, CA
- – Replacement Rv Refrigerator La Habra, CA
- – Rv Interior Remodel La Habra, CA
- – Rv Chairs La Habra, CA
- – Rv Interior Furniture La Habra, CA
- – Rv Couch La Habra, CA
- – Replacement Windows For Campers La Habra, CA
- – Awning Installation La Habra, CA
- – Rv Carpet Replacement La Habra, CA
- – OCRV Center
Rv Sofa Beds La Habra, CA
The following point inside below is to look for a factor where we obtain to great material, and after that tie right into that with a new piece in a means that structurally is gon na job. And also simply is basic sufficient to do. Allow me obtain some devices pulled with each other, and after that we'll look at out with the old and in with the new here.
I have actually obtained a negative end, easily determined, since that wood remained in truly, really negative shape. And after that just checking out the remaining lumber here. I'm looking for a part below where it gets noise (Replace Rv Flooring La Habra). Currently, the various other thing I recognize is that underneath here, right there is a steel part of the trailer.
If I had to come back further with the system I'm regarding to make use of here, I would be all right with that said. If in order to eliminate bad material, I needed to cut down here where I'm not over a steel frame part, I would certainly do that. What I have actually done so much lies the steel.
And the next point, let's get that negative area cut out. And what I want to do as I reduce is also raise a little bit. And I've currently got a brand-new piece cut.
Awning Installation La Habra, CA
There we go. And right here's things. The key to this are pieces of scrap plywood. And the method this is gon na work is we're gon na bridge that seam with those plywood scraps. Plywood is exceptionally strong things. And coupled with the plywood, we're going to include glue and screws, and that is really gon na make this primarily similar to having one long item once again when we're done.
The last point we desire is for the plywood to finish up standing happy with the two-by material. After that bridge that seam about equally. I have entered my hot little hands, one more item to go on that side. So I just have to obtain my platform off the beaten track here.
The last piece of plywood is about to obtain put in, but let's talk regarding a pair points. I've protected the floor with what's called mineral woollen or rock wool insulation.
When I'm cutting this item, the item that's gon na load in here, I would like to keep the manufacturing facility edge on that end butting versus the manufacturing facility side that's already in area, and after that the cut edge goes out here up versus the wall. Currently, if you need to do a trim, you have to do a trim, and in this case I did.
Rv Sofas La Habra, CA
So if you obtained ta do it, you obtained ta do it, however it in the excellent globe, factory edge to manufacturing facility side below on the lengthy joints, and on the short joints where pieces are meeting. The other thing is that we want to be half on a joist. What I indicate by that is that this chunk of plywood is half on this joist, and after that the following item of plywood is gon na come on here, so it's obtained something to be attached to, and that's simply a, you recognize, a building standard that you constantly comply with when you're doing floor covering or roof covering.

There aren't any type of pieces of insulation laying on top of the framework. I have actually obtained, if you keep an eye out right here, I have actually got these locations marked on the wall surface, so that as I occur with a screw gun, a lot more on that in a second, I know that sleeper, that joist is there, center is there, facility is there.
I should have an inch and a quarter staple going into it. I do not have a stapler that'll do that, however I do have a screw gun that I can make use of to drive long screws. So I'm doing this with a screw weapon rather than a stapler. All right, a whole lot of speaking, and let's consider getting the plywood ahead in.
Well, we finished with a great deal of screwing around.The entire floor was a lot of screwing around. Simply a great deal of little fussy things to do to get this right, yet certainly worth doing, since undoubtedly there were some poor areas in right here that had to go. With those screws, if there's any type of location where you feel like you might've missed out on, get a basic cordless screwdriver, back those screws out.
Replacement Windows For Rv La Habra, CA
That takes treatment of this flooring job, and it was interesting, however I will certainly state, I rejoice it's done.
Right here's the final tutorial concerning our recreational vehicle that was amounted to a week after we ended up improvements, and it's all around. We will cover how to eliminate the previous carpet and linoleum, selecting the best floor covering for a RV, preparing to set up flooring (particularly when you locate surprises under the old things), and lastly exactly how to mount recreational vehicle floor covering.
Replacement Rv Refrigerator La Habra, CA
It was in good form, but carpet in a RV is simply not sensible, specifically in a Motor home with two canines. The kitchen location and bathroom floor were linoleum.
Eliminating the carpet and linoleum really did not take much initiative given that neither were glued down. A shock was concealed behind the carpeting on the actions an air vent for the furnace! The heater was not as effective as anticipated throughout the wintertime, and a Recreational vehicle repair specialist suggested mounting a Fourth vent to suit the dimension of the unit, which we did.
Second shock was an open hole where the slide including the entertainment center satisfies the flooring. Instead of repairing it effectively, the previous owners covered it with carpet.
Rv Interior Remodel La Habra, CA
Dave's method of staple elimination included a big screwdriver and a hammer. Rocking it back and forth was less complicated on the wrist. Keep in mind: The black lining around the RV's slides must be left in tact and stapled.
Finally we were down to a tidy sub-floor and prepared to set up the new stuff. Certainly we didn't desire carpeting in the living area, so our floor covering alternatives were limited to vinyl planks, sheet plastic, linoleum, peel-and-stick ceramic tiles, and cork. We had success with peel-and-stick tiles in our very first recreational vehicle yet wished to attempt something brand-new.
Linoleum choices were doing not have and dated, which left us with plastic slabs vs. sheet vinyl. Several RV bloggers have set up plastic slabs in their rigs, the kind that break into place. After A whole lot of study, we found that about half of them enjoyed their floors. The other fifty percent created regarding planks moving and dividing throughout traveling or severe climate problems adversely affecting the flooring.
We additionally thought about that we weren't mosting likely to keep the RV lasting. The plan was to turn this RV when the baby had to do with a year old to provide him his very own room (exterior of his nursery in the living-room). A recreational vehicle floor covering selection must be affordable and attract the masses for resale.
Rv Chairs La Habra, CA
Obviously none of these considerations mattered ultimately since our motor home was completed. We discuss this because the floor covering choice appeared like a big deal at the time. It really had not been. The ethical here is to buy what makes you pleased since it could be taken away from you tomorrow.
We were thrilled to locate books upon books of samples at a local flooring supply shop. Simply so you recognize, these kinds of stores commonly won't mount flooring in a RECREATIONAL VEHICLE.
This shop supplied the plastic in differing thicknesses to personalize the comfort level. Considering we stayed in the recreational vehicle and the brand-new customers could also, we went with a luxurious alternative. It was shockingly affordable at $0.80 per square foot! To identify just how much plastic to acquire, we attracted a diagram of the motor home's dimensions to include the slides.
Rv Interior Furniture La Habra, CA
After subtracting video for that, we determined we required 354 square feet of flooring. The sketch on the lower half of the paper shows how we split a 12-foot sheet to fit all the spaces and crannies in the Recreational vehicle.
Total expense with taxes and costs was $326.94. We picked it up with the motor home in tow so we didn't have to tinker strapping it to the vehicle and risking creasing or harming the floor covering. On to the setup! Choose a warm day to mount. You only require one.
Ideally you have yard or a clean concrete pad to function on. The drawing was valuable for identifying just how much floor covering to purchase, however take straight dimensions in the Recreational vehicle for this part.
Rv Couch La Habra, CA
We discovered him on Craigslist in an ad for handyman kind job. We were on a limited timeline to move across the nation and thought paying for help would be well worth the money.
Fold the flooring onto itself to obtain it back right into the Recreational vehicle. We worked in sections, starting with the big slide, rather than removing out the entire gear. If you favor order over mayhem, move whatever out.
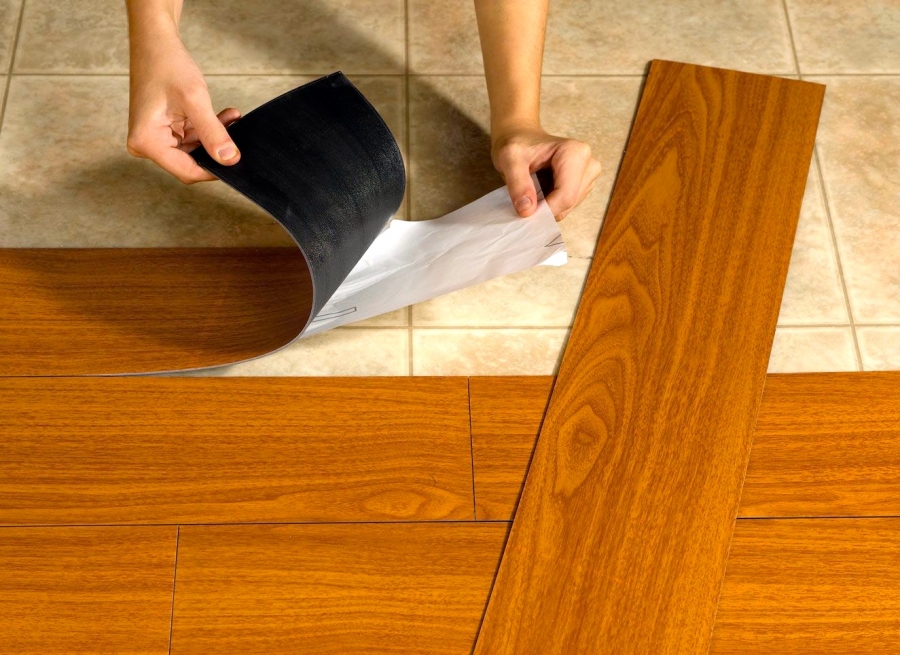
After laying the floor covering, make precision cuts with an energy blade. This set is Dave's favored. Staple around the perimeter with a heavy obligation staple weapon. Glue or various other adhesive is not essential. A floating flooring will certainly allow for more movement throughout traveling. Do not staple along the front of the slide.
Replacement Windows For Campers La Habra, CA
Next we moved to the center of the Motor home. The bigger item of flooring was even more of a difficulty to get into place yet definitely achievable with 2 individuals.
How to handle the front of the slides was a little a mystery when we started this job. We weren't certain if we would put an item of trim throughout it or something similar, but it looked wonderful by itself. The slides were moved in and out several times during our journey across the country, and they moved completely without leaving a mark.
We delighted in the RV flooring quite while we could and recommend this task to any RVer. It was a lot less complicated and faster than we anticipated. When it was all stated and done it took around a mid-day. Actually. That's all! The outcome was well worth the effort. It's an embarassment we didn't reach enjoy the brand-new flooring in our RV much longer.
mrstan64 wrote: Yes it is a sandwich of luan. the Luan was completely decayed on the upper layer and the foam was a bit musty. I wont be paying 5 grand for a 21 foot trailer flooring, however I would certainly be okay with 2 grand. OK, to put this into viewpoint. Not including products or tax obligations this is what $2K gets you.$25 per human resources, gives you 80 hrs of labor$50 per hr, provides you 40 hrs of labor$100 per hr, offers you 20 humans resources of labor.$150 per hr, offers you 13.3 humans resources of labor.
Awning Installation La Habra, CA
Even worse is the reality you ARE likewise looking for help in New England states, an insanely costly area to live with hugely high expense of items and solutions. Had a Bro that lived in VT, paid 4 times more for things than states southern of New York, you would promise that VT was some remote island.
Yeah, I did acquire it understanding it was decayed and of course, I intended to intestine it. You may not be intending to gut, but, till you start tearing points apart there is no other way to recognize for certain ...
TROUBLE: The bathroom was not firm on the floor. I got rid of the bathroom from the flooring and found the flange gasket undamaged yet the flooring decayed around the toilet flange. When removing the commode, I located the water supply installation was loosened at the commode. This enabled water to run down the supply line, drip onto the flooring, and run undetected over the edge of the plastic right into the flange location of the floor.
Rv Carpet Replacement La Habra, CA
This became an excellent selection due to the fact that of the item itself AND the e-mail assistance I obtained from Dr. Rot. Following are the actions I absorbed the repair work, with images for every step: Step One: Eliminated Commode and Examined DamageHere the toilet and flange are eliminated. In our case the flange unscrews on its 3 women string.
Rv Dinette Booth La Habra, CAReplace Rv Flooring La Habra, CA
Rv Carpet Replacement La Habra, CA
Awnings For Rv La Habra, CA
Rv Dinette Table La Habra, CA
Rv Dinette Booth La Habra, CA
Rv Dinette Booth La Habra, CA
Awnings For Rv La Habra, CA
Rv Couch Bed La Habra, CA
Rv Couch La Habra, CA
Rv Carpet Installation La Habra, CA
Replace Rv Flooring La Habra, CA
Replace Rv Flooring La Habra, CA
Awnings For Rv La Habra, CA
Rv Replacement Furniture La Habra, CA
Rv Restoration Companies La Habra, CA
Rv Dining Table La Habra, CA
Rv Carpet Replacement La Habra, CA
Rv Couch La Habra, CA
Remodeling Rv La Habra, CA
Rv Couch La Habra, CA
Rv Sofa Sleeper La Habra, CA
Replace Rv Flooring La Habra, CA
Replacement Rv Refrigerator La Habra, CA
Rv Interior Furniture La Habra, CA
Rv Dining Table La Habra, CA
Rv Replacement Furniture La Habra, CA
Rv Carpet Replacement La Habra, CA
Rv Couch La Habra, CA
Rv Chairs La Habra, CA
Awnings For Trailers La Habra, CA
Rv Dinette Booth La Habra, CA
Rv Dinette Table La Habra, CA
Rv Microwave Replacement La Habra, CA
Awnings For Trailers La Habra, CA
Replacement Rv Windows La Habra, CA
Rv Upholstery La Habra, CA
Replacement Rv Windows La Habra, CA
Rv Replacement Furniture La Habra, CA
Replace Rv Flooring La Habra, CA
Remodeling Rv La Habra, CA
Replacement Windows For Rv La Habra, CA
Awnings For Trailers La Habra, CA
Replacement Windows For Campers La Habra, CA
Replacement Rv Refrigerator La Habra, CA
Replace Rv Flooring La Habra, CA
Rv Floor Replacement La Habra, CA
Rv Floor Replacement La Habra, CA
Replacement Rv Windows La Habra, CA
Rv Floor Replacement La Habra, CA
Replacement Windows For Rv La Habra, CA
Rv Replacement Awnings La Habra, CA
Rv Restoration Companies La Habra, CA
Rv Sofa Beds La Habra, CA
Rv Dinette Booth La Habra, CA
Replacement Windows For Campers La Habra, CA
Awnings For Trailers La Habra, CA
Rv Couch Bed La Habra, CA
Rv Interior Furniture La Habra, CA
Awnings For Rv La Habra, CA
Motorhome Carpets La Habra, CA
Awning Installation La Habra, CA
Replacement Windows For Rv La Habra, CA
Rv Dinette Booth La Habra, CA
Rv Restoration Companies La Habra, CA
Remodeling Rv La Habra, CA
Awnings For Rv La Habra, CA
Rv Couch Bed La Habra, CA
Rv Upholstery La Habra, CA
Rv Dining Table La Habra, CA
Rv Replacement Furniture La Habra, CA
Rv Upholstery La Habra, CA
Rv Chairs La Habra, CA
Rv Refrigerator Replacement La Habra, CA
Rv Dinette Table La Habra, CA
Awnings For Trailers La Habra, CA
Rv Refrigerator Replacement La Habra, CA
Rv Replacement Furniture La Habra, CA
Around Me Seo Service La Habra, CA
Companies Near Me Seo Marketing La Habra, CA
OCRV Center
Table of Contents
- – Rv Sofa Beds La Habra, CA
- – OCRV Center
- – Awning Installation La Habra, CA
- – Rv Sofas La Habra, CA
- – Replacement Windows For Rv La Habra, CA
- – Replacement Rv Refrigerator La Habra, CA
- – Rv Interior Remodel La Habra, CA
- – Rv Chairs La Habra, CA
- – Rv Interior Furniture La Habra, CA
- – Rv Couch La Habra, CA
- – Replacement Windows For Campers La Habra, CA
- – Awning Installation La Habra, CA
- – Rv Carpet Replacement La Habra, CA
- – OCRV Center
Latest Posts
Camper Trailer Service Rowland Heights
Mercedes Sprinter Van Service La Habra
Replacement Windows For Rv Pomona
More
Latest Posts
Camper Trailer Service Rowland Heights
Mercedes Sprinter Van Service La Habra
Replacement Windows For Rv Pomona