All Categories
Featured
Table of Contents
- – Rv Roof Leak Repair Near Me Brea, CA
- – OCRV Center
- – Rubber Roofing For Campers Brea, CA
- – Rv Roof Leak Repair Brea, CA
- – Rubber Roofing For Campers Brea, CA
- – Rubber Roof For Camper Brea, CA
- – Epdm Rv Roof Repair Brea, CA
- – Roof Repair For Rv Brea, CA
- – Rv Slide Out Roof Repair Brea, CA
- – Rv Fiberglass Roof Repair Brea, CA
- – Rubber Roofing For Campers Brea, CA
- – Rubber Roof For Camper Brea, CA
- – Rv Rubber Roof Replacement Brea, CA
- – Rubber Roofing For Campers Brea, CA
- – Best Rv Roof Repair Brea, CA
- – OCRV Center
Rv Roof Leak Repair Near Me Brea, CA
Depending on the state of the roof covering's tears and splits, you may require to complete a patch fixing or replace the whole roofing. Pooled water and color motivate the growth of mold and mildew, which can be hard to clean up from a motor home roof. Recreational vehicle roof coverings can oxidize over the years.
Motor home roofing systems with inadequate drainage have low locations that accumulate water from cleaning or rainfall. Deterioration can produce roofing quality worries that avoid finishes from adhering to the roof covering.
Rubber Roofing For Campers Brea, CA
Carrying out motor home roof covering upkeep on a regular basis supplies numerous benefits: Though normal upkeep requires you to invest time and cash right into cleansing and repairing your roofing system, you will conserve much more in the future. Upkeep aids your RV last longer by taking care of minor problems before they come to be significant troubles. All sorts of climate can create damage on your roof.
A properly maintained RV is normally better than one with a leaking roofing system. RV roofing upkeep currently can make it less complicated to offer or sell your motor home in the future. No matter the roof material, recreational vehicle proprietors need to finish precautionary maintenance each to 3 months. You will require these devices and materials: Roof covering sealant secures the roofing system of your RV from damaging UV rays.
Recreational vehicles that have a built-in ladder generally have a walkable roof covering. Nonetheless, adhere to the recreational vehicle supplier's standards for the roof covering's weight limits. In addition, beware not to step on the roof covering cross spars and see for challenges when on the recreational vehicle roof covering for your safety and security. Debris, dirt and dust that collect on your recreational vehicle's roofing, incorporated with warmth and dampness, can motivate mold and mildew development.
Rv Roof Leak Repair Brea, CA
Cleaning your RV roof several times a year eliminates the debris and prevents mildew from taking hold and causing more damages. Adhere to these steps to cleanse your RV's roofing system: Sweep particles off the roof covering, particularly in the areas around the roof components. Utilize a tube and water to rinse off the roofing.
You can utilize a cleaning item created for Motor homes or make your very own cleaner utilizing products you currently carry hand. If the dirt and discolorations are embeded in, let the cleaner rest for a few minutes. Scrub the roofing with a brush, moving in circular movements. If required, include more cleaner and scrub till the roofing is clean.
This item has a light rough to remove the oxidation and can be buffed till it shines. A UV sealant or wax protects the motor home roof covering from UV rays, as direct exposure to the sun can make the roof covering material crack and leak. This sealer likewise makes the roofing system shiny and avoids black touches from basing on the wall surfaces.
Rubber Roofing For Campers Brea, CA
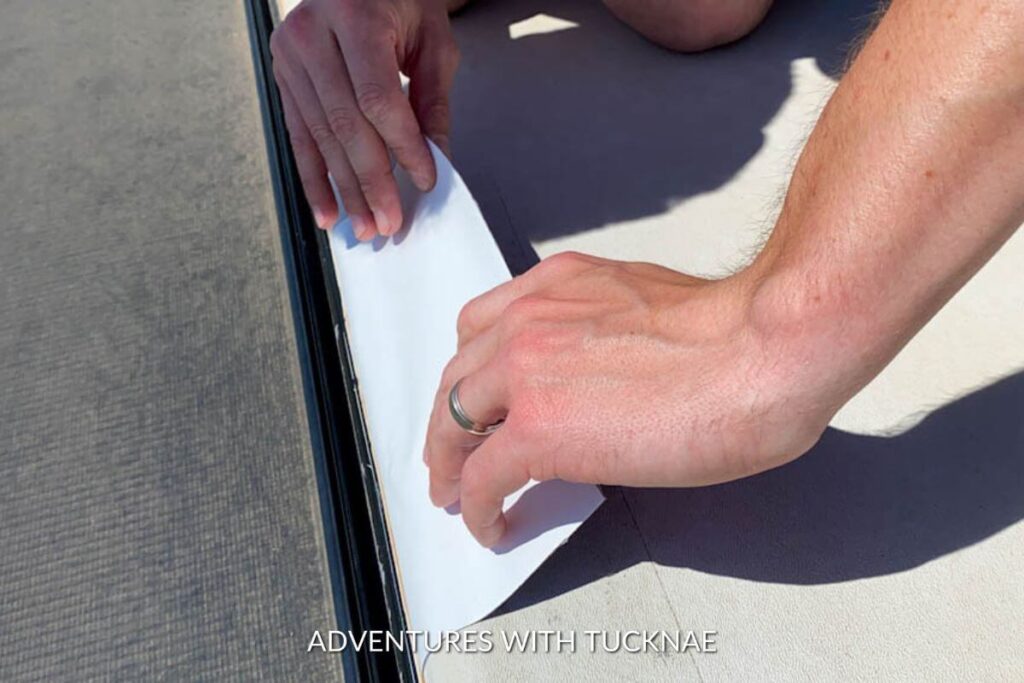
Some recreational vehicle insurance coverage anticipate a roofing system replacement every 10 to 15 years. EternaBond tape is one technique for motor home roof repair. This tape covers tiny splits and roof and wall splittings up alike, producing a watertight seal that stops water from entering your motor home. After cutting the tape to dimension, leave a big margin around the tear and press it into area, guaranteeing the piece is laid flat against the surface area.
KOA has greater than 500 campgrounds throughout The United States and Canada near historic cities and attractive landscapes. With greater than 55 years of experience, KOA provides a premier outdoor camping experience that caters to every tourist. This experience with outdoor camping encompasses looking after a motor home. KOA's handy team are trained and educated in motor home maintenance finest methods, from the roofing to the tires.
Established in Billings, MT in 1962, KOA's household of camping area brand names KOA Journey, KOA Holiday and KOA Hotel today offer more than a million camping families each year. KOA is devoted to "connecting individuals to the outdoors and each other" by giving individuals with a range of camping experiences and the information they need to make the many of their outdoor camping trip.
There are lots of reasons you ought to on a regular basis recoat your recreational vehicle roofing, securing it versus not simply water damage, but sun, wind, and damage. Like any type of kind of electric motor vehicle, RV roofing systems are developed to withstand tough weather, from snow to hail to a deluge. Nonetheless, the roof covering product can still break with time.
Rubber Roof For Camper Brea, CA
When you use Fluid Rubber Sealant products, make sure to meticulously comply with the application directions. These will certainly show the length of time the product requires to treat so that you can arrange the application around weather patterns where you live. You must check your recreational vehicle roof covering and the rest of the car every six months to catch tiny problems before they come to be big, expensive ones.
Regarding every 2 to four years is ideal, depending on the kind of weather condition you have and the kind of environment you drive via on a normal basis. Certain sort of environments can trigger even more deterioration on the roofing system than others. And always, after a large tornado or hefty snow, inspect the roofing system for damage.
While some indications that your recreational vehicle roof covering is harmed or has a leak are obvious, such as water streaming in during a rainstorm, various other indications of damage may not be as readily noticeable. Comprehending what to seek can make your evaluations much more efficient and bring your attention to problems when they're little sufficient to be a rather fast and cost-effective repair work.
And, when you make use of Fluid Rubber Sealcoat items, you know that you're utilizing the ideal items with the greatest online reputation. Rv Rubber Roof Replacement Cost Brea.
Epdm Rv Roof Repair Brea, CA
The thought of changing your RV's roofing could be at the top of your prospective RVing nightmares. The entire procedure can be complex, pricey, and time consuming. However, if you go in knowing what to expect, it will certainly be much less difficult, and you'll wind up with a shiny new roofing system offering comfort out when traveling.
The good news is, my Recreational vehicle roof replacement went easier than I expected. How do you understand if your roofing needs to be replaced?
Roof Repair For Rv Brea, CA
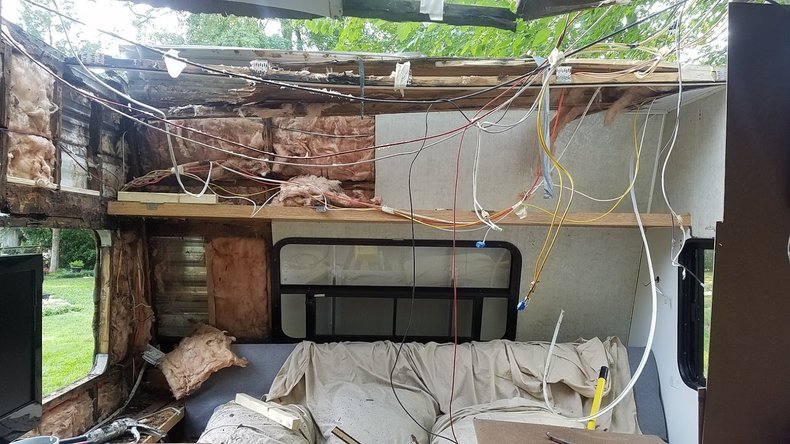
Inside damage is a possible indicator. Rv Rubber Roof Replacement Cost Brea. If you locate any type of indoor damages, the following action is to identify the source of the leakage.
If you have damages to your Motor home roof, an expert should identify whether you're much better off repairing or replacing the roof. Roofing system replacements are pricey but give both value and tranquility of mind.
If somebody else has crashed into your recreational vehicle, their insurance coverage could potentially cover the replacement. If your guarantee or insurance policy doesn't cover your roof covering substitute, you will require to pay for it out of pocket. If a warranty or insurance policy covers the price, you'll just have to pay the amount of your insurance deductible.
This applies to various other circumstances where damage happens, typically while the RV isn't in procedure, such as storm damage. Your future insurance prices may not rise if you're found not to be to blame. Unless you're extremely useful, you'll likely need to discover an expert to replace your motor home roofing system.
Rv Slide Out Roof Repair Brea, CA
I decided to browse Google and Facebook reviews for regional fixing firms. I additionally asked my insurance policy service provider for referrals. After locating a service center, we handed over our travel trailer for a first assessment. The technician offered a quote to our insurance policy business. In this instance, the insurance policy really did not send an insurer out for an in-person evaluation, however some companies require you to have an insurance adjuster consider your RV roofing to validate the damage.
From there, the roofing professional just offered one type of roofing system, so we didn't have any type of decisions to make. In some situations, you could have different roof choices to think about, with each offering unique benefits and drawbacks. Once the insurance was accepted, the technician reached function. It may take numerous weeks or months to get your RV's roof replaced.
Rv Fiberglass Roof Repair Brea, CA
After a few brief weeks, our roof replacement was complete. A complete Motor home roofing replacement typically costs numerous thousand dollars.
If you don't evaluate, reseal, and repair your motor home roof on a regular basis, you will certainly wind up with some pretty terrible water damages. This is something that will quickly reduce the value of your recreational vehicle and might also render it pointless. The good news is, dealing with your motor home roofing system is something you can most likely do all by yourself.
After regarding 10 years, it will additionally be required to reseal the entire roof. To do this, you'll require to climb up onto the roofing system, but be very careful when you do. Are you sure it's solid enough to support you? Is there a ladder at the back? If not, it most likely isn't solid enough to be strolled on.
Rubber Roofing For Campers Brea, CA
Next off, you'll intend to cleanse your roofing system completely, so regarding get rid of any dirt particles. You can utilize a lengthy dealt with brush for this, yet never ever utilize a cleaner that includes oil solvents or citrus components on your rubber or plastic roofing. These kinds of cleansers will trigger permanent damages to the surface area.
While you're cleaning up, scrape off any kind of debris or old roofing material, however take care while you do this as you can quickly elongate a tear, and even punch a hole with the roofing. You ought to after that dry out the roof covering as best as you can. Keep In Mind: Rubber recreational vehicle roofing systems can be extremely slippery when damp.
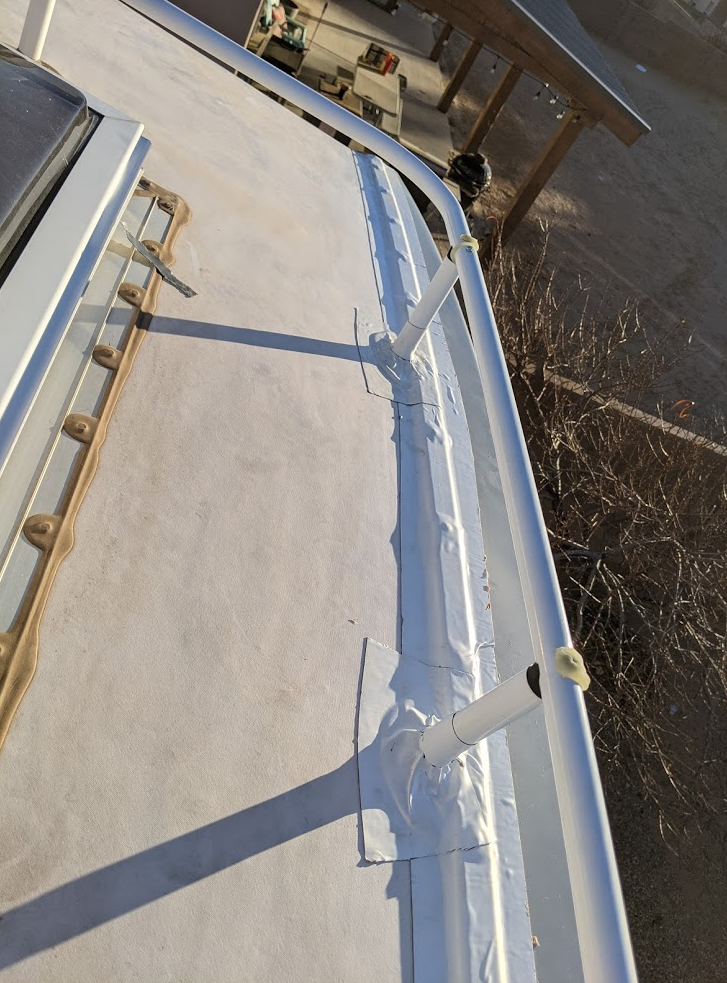
After the roof is tidy, you are going to intend to check the joints for holes, fractures or peeling off, so you can reseal anywhere necessary. You'll want to make a factor of resealing all joints once a year whether or not they reveal signs of wear.
Rubber Roof For Camper Brea, CA
When it pertains to picking the very best motor home roof sealer, you'll wish to take into consideration whether you are fixing a tear, resealing a seam, or sealing the whole roof. The type of roof is likewise crucial to keep in mind, as motor home roof coverings can be made from either EPDM (Ethylene Propylene Diene Monomer) and TPO (Thermal Polyolefin) and you require the product you use to be suitable with your roofing kind.
Dicor Self-Leveling Lap Sealant is an excellent option for reviewing old roofing seals. It can be used for area sealing or to reseal every joint on the RV roof. Simply cleanse the area well and apply with a caulk weapon. The stuff will certainly level itself out, so do not fret about that component.
Rv Rubber Roof Replacement Brea, CA
Similar to the EPDM system noted above, this finish item will cover your TPO roof and aid it last another 10 years. Prior To EPDM and TPO, steel was the product of selection for Motor home roofing systems.
The abovementioned EternaBond is still king when it pertains to fixing tiny damages on a metal roof covering. It likewise functions well for sealing joints. RV metal roof coverings do need to be completely resealed periodically. Family roofing system coatings will seal a metal roof simply great, however the most effective product by much, for steel roofing systems, is Dicor Steel RV Roof Coating.
Make certain to reseal whenever needed and make a factor of resealing all of the joints when every 12 months or so. You'll need to remove the existing roof.
Rubber Roofing For Campers Brea, CA
Replace harmed items. When the plywood is prepared, it's finest to cleanse the plywood with something like mineral spirits to get rid of any type of kind of debris.
Do this in little chunks the whole time the roof covering, cutting openings in the rubber roof for any type of attribute that will go back right into the roof. Finally, change your roofing's fans, skylights, and AC device. Seal each seam with the lap sealant we mentioned earlier. You'll likewise wish to use lap sealant to the sides of the roofing system.
In this article, we intend to show to you just how to do it yourself RV roofing fixing. Residing in a RV has impressive moments, but points additionally go wrong. Knowing just how to DIY a great deal of the points that can damage or screw up will certainly save you not only a great deal of money on RV fixings but might also conserve you a great deal of potential time in the shop! This article might contain affiliate web links.
I might obtain a tiny payment when you purchase using my web link. Read our Please Note Plan for more information. We try to plan our routes meticulously to avoid low-hanging things over the roadway. Often, though, we find ourselves in unexpected situations. This is just how we ended up with a few tiny tears on the roof of our motor home.
Best Rv Roof Repair Brea, CA
We assumed we were free from the branches, yet we ended up capturing a few of them on the far left side of the roof. There were a total amount of 4-5 small openings in the side of the roof. We didn't check the roofing because we really did not think we hit anything.
OCRV Center
Address: 23281 La Palma Ave Yorba Linda, CA 92887Phone: (714) 909-1444
Email: [email protected]
OCRV Center
Among the rips in our motor home roof covering A couple of weeks later on, we endured a serious electrical storm and a whole lot of rain. During the storm, we discovered that we had a tiny quantity of water dripping through one of the lights in the restroom. Luckily, we did not wind up with any type of long-term water damage.
Rv Rubber Roof Repair Chino Hills, CARv Roof Replacement Chino Hills, CA
Motorhome Roof Replacement Chino Hills, CA
Rv Roof Repair Fiberglass Chino Hills, CA
Rv Rubber Roof Replacement Chino Hills, CA
Rv Roof Repair Chino Hills, CA
Rv Rubber Roof Replacement Chino Hills, CA
Repair Rv Roof Chino Hills, CA
Rubber Roof For Camper Chino Hills, CA
Rv Roof Replacement Chino Hills, CA
Roof Repair For Rv Chino Hills, CA
Rubber Roofing For Campers Chino Hills, CA
Rubber Roof For Camper Chino Hills, CA
Rubber Roof For Rv Chino Hills, CA
Replace Rv Roof Chino Hills, CA
Rv Rubber Roof Repair Chino Hills, CA
Rv Roof Repair Service Near Me Chino Hills, CA
Rubber Roofing For Rv Chino Hills, CA
Rv Slide Out Roof Repair Chino Hills, CA
Replace Rv Roof Chino Hills, CA
Rv Roof Repair Near Me Chino Hills, CA
Rv Trailer Roof Repair Chino Hills, CA
Best Rv Roof Repair Chino Hills, CA
Rubber Roofing For Campers Chino Hills, CA
Motorhome Roof Replacement Chino Hills, CA
Rv Rubber Roof Replacement Cost Chino Hills, CA
Rv Slide Out Roof Repair Chino Hills, CA
Rubber Roofing For Rv Chino Hills, CA
Motorhome Roof Replacement Chino Hills, CA
Resealing Rv Roof Chino Hills, CA
Epdm Rv Roof Repair Chino Hills, CA
Rv Roof Maintenance Chino Hills, CA
Rubber Roofing For Rv Chino Hills, CA
Rv Roof Repair Chino Hills, CA
Rubber Roofing For Rv Chino Hills, CA
Rv Rubber Roof Replacement Cost Chino Hills, CA
Rv Trailer Rubber Roof Repair Chino Hills, CA
Rv Roof Repair Fiberglass Chino Hills, CA
Rv Roof Repair Chino Hills, CA
Rv Trailer Roof Repair Chino Hills, CA
Rv Fiberglass Roof Repair Chino Hills, CA
Roof Repair For Rv Chino Hills, CA
Rv Roof Maintenance Chino Hills, CA
Resealing Rv Roof Chino Hills, CA
Rubber Roof Installation Chino Hills, CA
Rv Roof Leak Repair Chino Hills, CA
Roof Repair For Rv Chino Hills, CA
Roof Repair For Rv Chino Hills, CA
Best Rv Roof Repair Chino Hills, CA
Rv Roof Maintenance Chino Hills, CA
Motorhome Roof Replacement Chino Hills, CA
Rv Slide Out Roof Repair Chino Hills, CA
Repair Rv Roof Leak Chino Hills, CA
Rv Roof Repair Fiberglass Chino Hills, CA
Rubber Roof For Rv Chino Hills, CA
Epdm Rv Roof Repair Chino Hills, CA
Rv Roof Repair Service Near Me Chino Hills, CA
Rv Roof Replacement Chino Hills, CA
Rv Trailer Roof Repair Chino Hills, CA
Rubber Roofing For Campers Chino Hills, CA
Rv Fiberglass Roof Repair Chino Hills, CA
Rv Roof Leak Repair Near Me Chino Hills, CA
Replace Rv Roof Chino Hills, CA
Rv Rubber Roof Repair Chino Hills, CA
Replace Rv Roof Chino Hills, CA
Rubber Roofing For Rv Chino Hills, CA
Best Rv Roof Repair Chino Hills, CA
Rv Fiberglass Roof Repair Chino Hills, CA
Rv Roof Leak Repair Chino Hills, CA
Rv Roof Leak Repair Near Me Chino Hills, CA
Rv Roof Leak Repair Chino Hills, CA
Rubber Roof For Camper Chino Hills, CA
Rubber Roof Installation Chino Hills, CA
Rv Roof Maintenance Chino Hills, CA
Rv Slide Out Roof Repair Chino Hills, CA
Epdm Rv Roof Repair Chino Hills, CA
Epdm Rv Roof Repair Chino Hills, CA
Class C Rv Roof Repair Chino Hills, CA
Near My Location Seo Optimization Chino Hills, CA
Find A Good Local Seo Packages Chino Hills, CA
OCRV Center
Table of Contents
- – Rv Roof Leak Repair Near Me Brea, CA
- – OCRV Center
- – Rubber Roofing For Campers Brea, CA
- – Rv Roof Leak Repair Brea, CA
- – Rubber Roofing For Campers Brea, CA
- – Rubber Roof For Camper Brea, CA
- – Epdm Rv Roof Repair Brea, CA
- – Roof Repair For Rv Brea, CA
- – Rv Slide Out Roof Repair Brea, CA
- – Rv Fiberglass Roof Repair Brea, CA
- – Rubber Roofing For Campers Brea, CA
- – Rubber Roof For Camper Brea, CA
- – Rv Rubber Roof Replacement Brea, CA
- – Rubber Roofing For Campers Brea, CA
- – Best Rv Roof Repair Brea, CA
- – OCRV Center
Latest Posts
Insurance For Seniors Laguna Woods
Hood Filter Replacement Monterey Park
Hood Filter Cleaning Panorama City
More
Latest Posts
Insurance For Seniors Laguna Woods
Hood Filter Replacement Monterey Park
Hood Filter Cleaning Panorama City