All Categories
Featured
Table of Contents
- – Motorhome Roof Replacement Mira Loma, CA
- – OCRV Center
- – Best Rv Roof Repair Mira Loma, CA
- – Rv Rubber Roof Repair Mira Loma, CA
- – Rv Slide Out Roof Repair Mira Loma, CA
- – Rv Roof Repair Mira Loma, CA
- – Rv Roof Replacement Mira Loma, CA
- – Rv Roof Repair Mira Loma, CA
- – Epdm Rv Roof Repair Mira Loma, CA
- – Rubber Roof For Rv Mira Loma, CA
- – Rv Roof Replacement Mira Loma, CA
- – Rv Roof Leak Repair Mira Loma, CA
- – Rubber Roofing For Campers Mira Loma, CA
- – Rv Roof Replacement Mira Loma, CA
- – Rv Roof Repair Near Me Mira Loma, CA
- – OCRV Center
Motorhome Roof Replacement Mira Loma, CA
Depending upon the state of the roof's splits and fractures, you may need to complete a spot repair or replace the entire roof. Pooled water and shade encourage the development of mold and mildew and mildew, which can be challenging to cleanse from a motor home roofing system. RV roof coverings can oxidize for many years.
RV roof coverings with poor drain have low areas that collect water from cleaning or rainfall. Water being in one area for also long can compromise the roof covering material and urge germs growth. Direct exposure to UV rays can cause the roof material to degrade. Degradation can produce roofing quality concerns that avoid finishes from sticking to the roof.
Best Rv Roof Repair Mira Loma, CA
Performing motor home roof covering upkeep frequently offers several benefits: Though regular upkeep needs you to invest time and cash into cleansing and fixing your roof, you will conserve much more in the future. Upkeep assists your recreational vehicle last much longer by taking care of minor issues before they become major troubles. All sorts of climate can cause wear and tear on your roofing.
A well-maintained RV is generally more important than one with a leaky roofing. Recreational vehicle roof maintenance now can make it much easier to offer or sell your recreational vehicle in the future. Regardless of the roof covering product, motor home proprietors must complete precautionary maintenance each to 3 months. You will certainly need these devices and products: Roofing system sealant shields the roofing of your RV from destructive UV rays.

Recreational vehicles that have a built-in ladder usually have a walkable roof. Additionally, be cautious not to tip on the roof covering cross spars and view for challenges when on the Recreational vehicle roof for your safety and security.
Rv Rubber Roof Repair Mira Loma, CA
Cleaning your recreational vehicle roofing system a number of times a year eliminates the particles and stops mold from holding and causing further damage. Adhere to these steps to clean your RV's roof covering: Sweep debris off the roofing system, specifically in the locations around the roofing system fixtures. Utilize a hose pipe and water to rinse the roof covering.
You can utilize a cleansing item developed for Recreational vehicles or make your very own cleaner making use of items you currently have on hand. If the dust and discolorations are embeded in, let the cleaner rest for a few minutes. Scrub the roof with a brush, relocating round activities. If required, include more cleaner and scrub till the roof covering is clean.
This product has a light unpleasant to eliminate the oxidation and can be rubbed until it radiates. A UV sealant or wax protects the RV roof from UV rays, as direct exposure to the sunlight can make the roofing material fracture and leakage. This sealer likewise makes the roof covering glossy and prevents black streaks from creating on the walls.
Rv Slide Out Roof Repair Mira Loma, CA
Some Motor home insurance coverage plans anticipate a roof covering substitute every 10 to 15 years. EternaBond tape is one method for Motor home roof covering repair.
KOA has more than 500 campgrounds throughout The United States and Canada near historical cities and beautiful landscapes. With even more than 55 years of experience, KOA provides a leading outdoor camping experience that deals with every vacationer. This experience with camping reaches looking after a RV. KOA's handy team are educated and knowledgeable in motor home maintenance finest techniques, from the roof covering to the tires.
Founded in Billings, MT in 1962, KOA's household of campground brands KOA Journey, KOA Vacation and KOA Resort today serve greater than a million camping family members each year. KOA is dedicated to "connecting individuals to the outdoors and each various other" by offering people with a selection of outdoor camping experiences and the information they require to make the many of their outdoor camping journey.
There are several reasons you should regularly recoat your motor home roofing, securing it against not simply water damage, however sun, wind, and put on and tear. Like any kind of kind of car, recreational vehicle roofings are constructed to hold up against challenging weather condition, from snow to hail to a deluge. Nonetheless, the roofing system material can still wear with time.
Rv Roof Repair Mira Loma, CA
When you use Liquid Rubber Sealant products, be sure to very carefully comply with the application directions. These will certainly show just how long the item requires to heal to make sure that you can schedule the application around weather condition patterns where you live. You need to check your RV roof and the rest of the vehicle every six months to catch small problems prior to they come to be huge, costly ones.
Concerning every 2 to four years is optimal, depending on the kind of weather condition you have and the kind of atmosphere you drive through on a routine basis. Particular kinds of environments can cause even more deterioration on the roofing system than others. And always, after a big storm or hefty snow, evaluate the roof covering for damages.
While some signs that your recreational vehicle roofing is damaged or has a leak are noticeable, such as water streaming in throughout a rainstorm, various other signs of damage might not be as easily obvious. Recognizing what to look for can make your assessments much more effective and bring your interest to troubles when they're tiny adequate to be a relatively rapid and low-cost repair service.
And, when you make use of Liquid Rubber Sealcoat items, you understand that you're making use of the most effective products with the best reputation. Mira Loma Resealing Rv Roof.
Rv Roof Replacement Mira Loma, CA
The idea of replacing your recreational vehicle's roofing could be at the top of your prospective RVing headaches. The entire process can be confusing, expensive, and time consuming. However, if you go in recognizing what to anticipate, it will certainly be much less demanding, and you'll finish up with a shiny brand-new roofing system giving satisfaction out on the road.
Fortunately, my Motor home roof covering replacement went easier than I prepared for. Exactly how do you recognize if your roofing needs to be changed?
Rv Roof Repair Mira Loma, CA
Inside damage is a possible indication. Mira Loma Resealing Rv Roof. If you locate any indoor damage, the following action is to determine the resource of the leakage.
If you have damage to your Recreational vehicle roof, an expert must figure out whether you're much better off repairing or replacing the roofing. Roofing substitutes are costly however provide both value and peace of mind.
If somebody else has actually collapsed right into your RV, their insurance can possibly cover the substitute. If your guarantee or insurance coverage does not cover your roofing replacement, you will certainly require to spend for it out of pocket. If a guarantee or insurance policy covers the expense, you'll just need to pay the quantity of your deductible.
This relates to other circumstances where damage occurs, generally while the motor home isn't in procedure, such as storm damage. Your future insurance prices might not go up if you're discovered not to be to blame. Unless you're incredibly useful, you'll likely require to locate a specialist to replace your RV roofing.
Epdm Rv Roof Repair Mira Loma, CA
After finding a repair service store, we dropped off our travel trailer for a first evaluation. In this situation, the insurance policy really did not send out an adjuster out for an in-person assessment, however some business require you to have an insurance adjuster look at your Recreational vehicle roofing system to verify the damages.
From there, the roof professional only offered one kind of roofing, so we didn't have any kind of choices to make. In some situations, you may have various roof alternatives to take into consideration, with each offering unique advantages and disadvantages. As soon as the insurance was approved, the service technician obtained to function. It might take a number of weeks or months to obtain your motor home's roof covering replaced.
Rubber Roof For Rv Mira Loma, CA
After a few short weeks, our roofing system replacement was complete. A full Motor home roofing system substitute typically sets you back numerous thousand bucks.
If you don't inspect, reseal, and repair your motor home roof covering regularly, you will certainly end up with some lovely terrible water damage. This is something that will rapidly decrease the value of your motor home and might also render it unusable. The good news is, taking treatment of your motor home roof covering is something you can probably do all by yourself.
After about 10 years, it will certainly additionally be necessary to reseal the entire roof. To do this, you'll need to climb onto the roofing system, yet be extremely careful when you do. Are you sure it's solid enough to sustain you? Exists a ladder at the back? Otherwise, it probably isn't solid enough to be strolled on.
Rv Roof Replacement Mira Loma, CA
Next off, you'll intend to clean your roofing extensively, so regarding remove any dust bits. You can use a long managed brush for this, but never utilize a cleaner which contains petroleum solvents or citrus ingredients on your rubber or vinyl roofing. These kinds of cleansers will certainly trigger long-term damages to the surface.
While you're cleaning, remove any kind of debris or old roofing system material, yet beware while you do this as you can easily extend a tear, and even punch an opening through the roof covering. You must then dry the roof covering as best as you can. Keep In Mind: Rubber RV roofing systems can be extremely unsafe when wet.
After the roof covering is tidy, you are mosting likely to intend to inspect the seams for holes, fractures or peeling, so you can reseal wherever essential. You'll desire to make a factor of resealing all joints when a year whether or not they show signs of wear.
Rv Roof Leak Repair Mira Loma, CA
When it comes to selecting the best RV roofing sealer, you'll want to take into consideration whether you are fixing a tear, resealing a seam, or securing the entire roofing. It can be utilized for area sealing or to reseal every joint on the Recreational vehicle roof covering. Just clean the area well and apply with a caulk weapon.
Rubber Roofing For Campers Mira Loma, CA
This primes and layers the roofing system to develop a wonderful, safety covering that'll last for years. Finally, there is the Dicor TPO Roof Finishing System. Comparable to the EPDM system detailed above, this covering item will cover your TPO roofing system and assist it last an additional 10 years. Prior To EPDM and TPO, metal was the product of option for recreational vehicle roof coverings.
The aforementioned EternaBond is still king when it comes to fixing small problems on a steel roofing system. Recreational vehicle metal roofings do require to be absolutely resealed from time to time.
Make sure to reseal whenever necessary and make a point of resealing all of the joints when every 12 months or so. You'll need to eliminate the current roof.
Rv Roof Replacement Mira Loma, CA
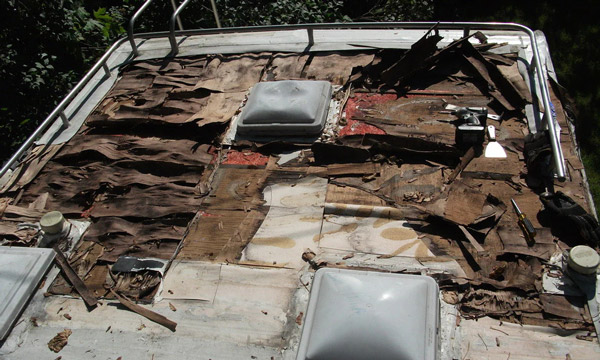
Get rid of the vent followers, skylights, and AC device. Peel the existing layer of rubber back until you see the plywood framework underneath. Check plywood for rot, bowing, mold and mildew, or splintering. Replace harmed items. When the plywood prepares, it's finest to cleanse the plywood with something like mineral spirits to eliminate any type of sort of debris.
Do this in little pieces all along the roof covering, cutting openings in the rubber roofing for any type of function that will certainly go back right into the roofing system. Change your roofing's followers, skylights, and Air conditioner system. Seal each seam with the lap sealant we mentioned earlier. You'll likewise wish to apply lap sealant to the edges of the roof covering.
In this message, we intend to share with you how to do it yourself RV roof covering fixing. Staying in a RV has remarkable minutes, however points additionally go wrong. Understanding exactly how to DIY a great deal of things that can break or mess up will certainly conserve you not only a great deal of money on recreational vehicle repair work however might also conserve you a great deal of potential time in the shop! This blog post might contain associate links.
I may get a small payment when you buy utilizing my web link. Read our Please Note Plan for more information. We attempt to prepare our courses carefully to prevent low-hanging things over the road. Occasionally, however, we find ourselves in unplanned scenarios. This is how we ended up with a few small rips on the roofing of our recreational vehicle.
Rv Roof Repair Near Me Mira Loma, CA

We assumed we were free from the branches, yet we finished up catching a few of them on the much left side of the roofing. There were an overall of 4-5 little openings in the side of the roof covering. Initially, we didn't check the roofing system due to the fact that we really did not assume we hit anything.
OCRV Center
Address: 23281 La Palma Ave Yorba Linda, CA 92887Phone: (714) 909-1444
Email: [email protected]
OCRV Center
One of the splits in our motor home roofing A couple of weeks later on, we withstood an extreme thunderstorm and a whole lot of rainfall. During the storm, we found that we had a percentage of water leaking through one of the light components in the bathroom. The good news is, we did not wind up with any type of irreversible water damages.
Best Rv Roof Repair Mira Loma, CARepair Rv Roof Mira Loma, CA
Rv Roof Replacement Mira Loma, CA
Rv Roof Leak Repair Near Me Mira Loma, CA
Repair Rv Roof Leak Mira Loma, CA
Rv Roof Repair Mira Loma, CA
Rv Fiberglass Roof Repair Mira Loma, CA
Rv Trailer Rubber Roof Repair Mira Loma, CA
Rv Roof Leak Repair Mira Loma, CA
Rv Roof Maintenance Mira Loma, CA
Repair Rv Roof Mira Loma, CA
Roof Repair For Rv Mira Loma, CA
Rubber Roof Installation Mira Loma, CA
Resealing Rv Roof Mira Loma, CA
Replace Rv Roof Mira Loma, CA
Rv Trailer Roof Repair Mira Loma, CA
Class C Rv Roof Repair Mira Loma, CA
Rv Roof Leak Repair Near Me Mira Loma, CA
Rv Roof Leak Repair Mira Loma, CA
Best Rv Roof Repair Mira Loma, CA
Rv Rubber Roof Replacement Cost Mira Loma, CA
Rv Slide Out Roof Repair Mira Loma, CA
Rubber Roof For Rv Mira Loma, CA
Rv Roof Repair Mira Loma, CA
Rubber Roofing For Campers Mira Loma, CA
Repair Rv Roof Leak Mira Loma, CA
Repair Rv Roof Mira Loma, CA
Rv Trailer Roof Repair Mira Loma, CA
Rv Roof Repair Mira Loma, CA
Rubber Roof Installation Mira Loma, CA
Repair Rv Roof Leak Mira Loma, CA
Rv Rubber Roof Replacement Cost Mira Loma, CA
Rubber Roofing For Rv Mira Loma, CA
Replace Rv Roof Mira Loma, CA
Class C Rv Roof Repair Mira Loma, CA
Rubber Roofing For Rv Mira Loma, CA
Replace Rv Roof Mira Loma, CA
Repair Rv Roof Leak Mira Loma, CA
Rv Roof Replacement Mira Loma, CA
Rv Trailer Roof Repair Mira Loma, CA
Rv Roof Repair Fiberglass Mira Loma, CA
Rv Rubber Roof Maintenance Mira Loma, CA
Rv Roof Leak Repair Mira Loma, CA
Motorhome Roof Replacement Mira Loma, CA
Rv Trailer Roof Repair Mira Loma, CA
Rubber Roofing For Campers Mira Loma, CA
Rv Trailer Roof Repair Mira Loma, CA
Rubber Roof For Camper Mira Loma, CA
Rv Roof Maintenance Mira Loma, CA
Rv Roof Maintenance Mira Loma, CA
Rv Roof Leak Repair Near Me Mira Loma, CA
Rv Trailer Rubber Roof Repair Mira Loma, CA
Rv Roof Replacement Mira Loma, CA
Rv Roof Leak Repair Near Me Mira Loma, CA
Rv Trailer Rubber Roof Repair Mira Loma, CA
Rv Roof Leak Repair Near Me Mira Loma, CA
Rv Roof Repair Near Me Mira Loma, CA
Rv Roof Repair Near Me Mira Loma, CA
Rubber Roof Installation Mira Loma, CA
Rv Roof Maintenance Mira Loma, CA
Rv Roof Repair Fiberglass Mira Loma, CA
Rubber Roofing For Campers Mira Loma, CA
Rv Rubber Roof Replacement Mira Loma, CA
Rv Roof Replacement Mira Loma, CA
Motorhome Roof Replacement Mira Loma, CA
Rv Roof Repair Fiberglass Mira Loma, CA
Rv Slide Out Roof Repair Mira Loma, CA
Rubber Roof For Rv Mira Loma, CA
Class C Rv Roof Repair Mira Loma, CA
Rv Trailer Rubber Roof Repair Mira Loma, CA
Repair Rv Roof Leak Mira Loma, CA
Replace Rv Roof Mira Loma, CA
Resealing Rv Roof Mira Loma, CA
Rv Roof Repair Service Near Me Mira Loma, CA
Rv Trailer Roof Repair Mira Loma, CA
Rv Rubber Roof Replacement Cost Mira Loma, CA
Motorhome Roof Replacement Mira Loma, CA
Rv Rubber Roof Repair Mira Loma, CA
Near You Seo Optimization Mira Loma, CA
Near Here Seo Marketing Company Mira Loma, CA
OCRV Center
Table of Contents
- – Motorhome Roof Replacement Mira Loma, CA
- – OCRV Center
- – Best Rv Roof Repair Mira Loma, CA
- – Rv Rubber Roof Repair Mira Loma, CA
- – Rv Slide Out Roof Repair Mira Loma, CA
- – Rv Roof Repair Mira Loma, CA
- – Rv Roof Replacement Mira Loma, CA
- – Rv Roof Repair Mira Loma, CA
- – Epdm Rv Roof Repair Mira Loma, CA
- – Rubber Roof For Rv Mira Loma, CA
- – Rv Roof Replacement Mira Loma, CA
- – Rv Roof Leak Repair Mira Loma, CA
- – Rubber Roofing For Campers Mira Loma, CA
- – Rv Roof Replacement Mira Loma, CA
- – Rv Roof Repair Near Me Mira Loma, CA
- – OCRV Center
Latest Posts
Health Insurance Plans For Family Laguna Niguel
Swamp Cooler Water Line Repair Altadena
North Hills Home Ac Repair
More
Latest Posts
Health Insurance Plans For Family Laguna Niguel
Swamp Cooler Water Line Repair Altadena
North Hills Home Ac Repair